Thursday, March 29, 2012

Windows Phone 7&8 - Barcode Wallet

About Barcode Wallet for Windows Phone

Save space in your wallet by digitizing the barcodes of any loyalty or memberships cards that you carry around.

Features:

  • See your most used barcodes at a glance
  • Tap a card to quickly bring up the barcode ready for scanning.
  • Pin your most used cards to the start screen.
  • Scan a barcode directly from the phone from a video feed, photo, or saved image.
  • Backup and restore barcodes to Onedrive

Usage

These are the basic steps to add a new barcode to the app by scanning it.

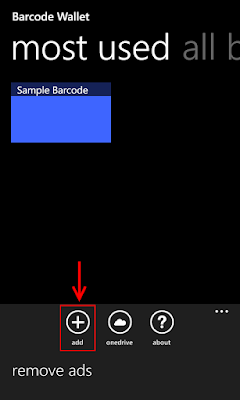
Add new barcode

Tap the add button in the menu bar
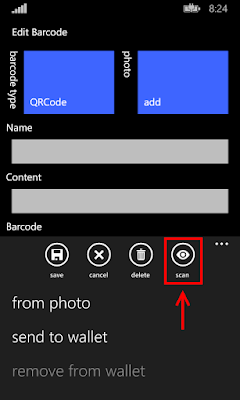
Start Scanning

Tap the scan button in the menu bar
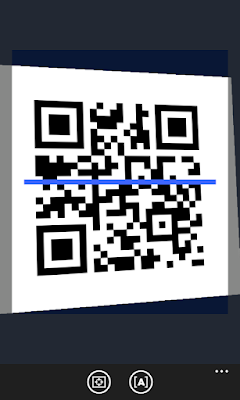
Scan the barcode

Point the phones camera at the barcode.
See scanning tips for further details on using the camera to capture the barcode.
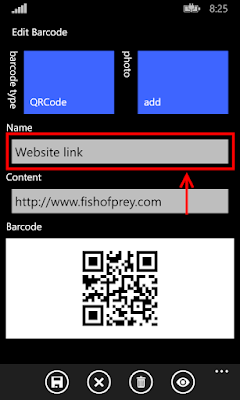
Name the barcode

Enter a name for the barcode
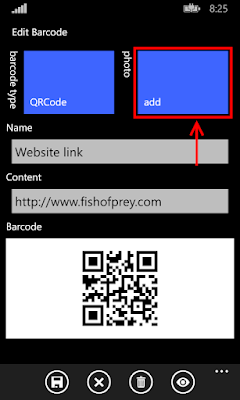
Add a photo

Optionally add a photo to identify the barcode using the add button next to the photo label.

Select and crop the image.
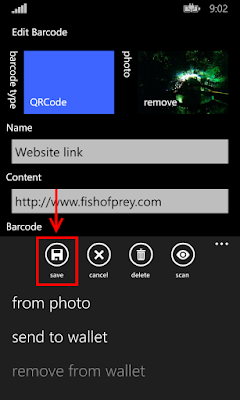
Save the barcode

Tap the save button in the menu bar
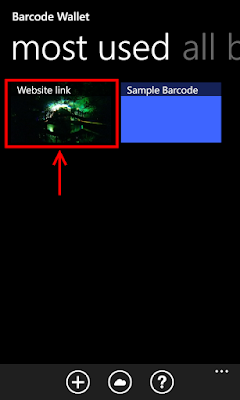
View the barcode

Tap the barcode to view it
Tips and FAQ

Scanning Barcodes into the phone

  • Ensure that the complete barcode can be seen clearly in the photo
  • Try to avoid the flash over saturating the barcode
  • Orientate the barcode to match the phones orientation
  • Check that the barcode format is supported by the app.
  • If you are having issues with a particular barcode try sending an image of it to an online reader. I've found the ClearImage Free Online Barcode Reader / Decoder to work well and provide back useful information, such as the barcode type as well as the data.

Scanning barcodes directly from the phones screen

Unfortunately not all types of barcode scanner are capable of reading barcodes directly from a cell phone screen. The major factor is the type of scanner being used.

A laser scanner sends out beams of light and uses the reflected light to read the light and dark bars. White bars reflect back the majority of the light. Black bars absorb the majority of light and reflect back very little. Therein lies the issue for scanning a barcode from a cellphone screen. Firstly, The glass and other layers of a cellphone screen are more reflective than a printed barcode. The excess light they reflect back will prevent the scanner from clearly seeing the difference between light and dark portions of the barcode. Secondly, a cellphone screen does not appear white because it is reflecting light. Rather, it is emitting light from a number of other colours to create white (typically red, green and blue pixels). These multiple pixels emitting light together won't reflect light in the way that a printed white does. For these reasons a laser scanner cannot read a barcode from a phones screen.

Another type of scanner is an imager or CCD Barcode scanner. These work more like a digital camera and will see the light emitted from the screen. CCD scanners can read a barcode from a cellphone screen.

See also:

How do I delete a barcode from the wallet?

On the first screen, try holding down on the barcode in question and then selecting edit.
On the edit screen there will be a delete link in the application bar at the bottom of the screen.

Scanning a PDF417 barcode produces the error "CP437 is not a supported encoding name. Parameter name: name"

Based on the error message it seems the barcode contains characters that aren't supported by the Windows Phone platform.

CP437 refers to Code page 437

Unable to create Onedrive folder to store barcodes

Try manually creating the folder if the Onedrive permissions don't allow the app to. The folder should be called "Barcode Wallet" and be at the top level of the files directory. E.g.

Known Issues with v2.8.x

Unfortunately there in a known bug with v2.8.78 and 2.8.80.

  1. On WP7 and WP8 handsets there is a bug with the app bar focus button on the barcode scanning page. This prevents adjusting the focus to scan a barcode.
    Workaround: Half pressing the hardware camera button will also focus the camera.

8th June 2013 - I have resolved the bug and submitted v2.9.x to the store. It may take a few days for it to pass the store certification process.

How do I sync barcodes to Onedrive from the phone?

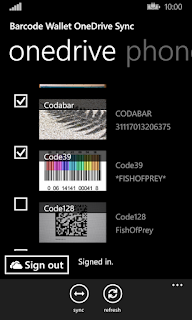
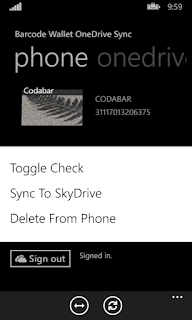
From the "Barcode Wallet Onedrive Sync" page (accessed via the cloud button in the app bar). Press and hold on the barcode you want to sync to Onedrive. An option should appear to transfer it.

Alternatively, tap to the left of a barcode to check it. Then use the "sync" command to transfer all the checked barcodes. Pressing "sync" with no selections will give the option of transferring all the barcodes.

If you select Onedrive rather than phone the sync direction is reversed.
How do I sync barcodes to the native Wallet app?

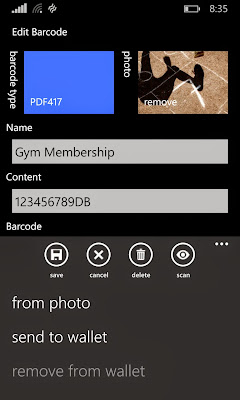
Wallet integration is currently supported from the barcode edit page. Expand out the application bar and select "send to wallet".

Current issues and enhancement requests

Thursday, March 22, 2012

Windows Phone 7 - Sun Tracker

About Sun Tracker for WP7

Track the position of the sun throughout the day. Determine when sunrise will occur and then track the path of the sun through the sky until sunset. With tracking enabled the phone can be pointed at the sky to measure current elevation and azimuth angle.

2 of 8

New in version 2.0. Switch to the augmented reality vision mode and see the path of the sun overlayed on your environment. See exactly where the sun will go today and easily switch to the Solstice and Equinox paths.

Use the details page to calculate the Time, Elevation and Azimuth angle of:

  • Astronomical Twilight (Dawn and Dusk)
  • Nautical Twilight (Dawn and Dusk)
  • Civil Twilight (Dawn and Dusk)
  • Sunrise
  • Sunset
  • A user selected date and time.

The equation of time, Solar declination and Daylight duration are also calculated. All values are in the local timezone and adjusted for daylight savings if applicable.

Select a location on the map page or use the GPS to go to your current location. The map page also shows the direction and time of sunrise and sunset.

A useful tool for:

  • Real Estate - When will the sun come over the hill? Will a tree or building block most of the winter sun?
  • Gardeners - will the planting location suit have the right amount of sun exposure?
  • Photographers - When will twilight occur?
  • Architects - Maximise winter sun exposure and minimise summer heat gain.
  • Solar panels - What angle and inclination should the panels be placed at to be optimal for the location?

The settings page allows you to toggle access to location data and provide an optional correction to the compass bearing.

Versions:

  • 2.0
    • Adds augmented reality sun tracking via the vision button. For best results enable the use of the device location and calibrate the compass before use.
    • The last Zoom level used on the map it kept between uses and there is an option on the settings page to show zoom level buttons on the map.
  • 1.3
    • Adds Dates page that includes Solstices, Equinoxes, Perihelion, Aphelion
  • 1.1
    • Adds pin option for current location to display rise and set times plus length of day on the back of the apps tile.
    • Tapping the rise or set times in the compass view will toggle to showing the time until the event occurs.

User Guide

Tips

  • Ensure your current location is correct. Use the "location" button in the application bar to update to your current latitude and longitude. Verify this on the map page.
  • Ensure your select date is current. This can be altered with the date controls at the bottom of the page.
  • Use the "vision" button to see the projected suns path for your selected day.
  • You can jump to important dates such as the solstice or equinox on the dates page.

Compass

1 of 8

The compass shows the position of the sun through out a 24 hour period. The position of the sun is plotted according to its true north bearing (Azimuth). The points move into the circle as the elevation above the horizon increases. E.g. If the sun is directly overhead (at the Zennith) it will be in the middle of the circle.

Sunrise and Sunset times along with the Azimuth bearing are shown above the compass.

Details

3 of 8

The Details page gives times for dusk and dawn, sunset and sunrise. These will vary if you change the selected date or location.

Map

4 of 85 of 8

The Map page allows you to choose the latitude and longitude for the sun calculations. The location button will recenter the view to your current latitude and longitude.

Lines show the sunrise and sunset azimuth angles and are labeled with the applicable event times. The remaining line shows the azimuth for the selected date and time. The control on the left of the page shows the elevation.

Dates

5 of 8

The Dates page shows the Solstices, Equinoxes, Perihelion (Earth nearest to the sun), and Aphelion (Earth farthest from the Sun) for the currently selected year.

Wednesday, March 21, 2012

Salesforce - Obscure field integrity exception when upserting PricebookEntry

System.DmlException: Upsert failed. First exception on row 0 with id 01uF0000007wq56IAA; first error: FIELD_INTEGRITY_EXCEPTION, field integrity exception: []

I encountered this exception in an Apex batch job that I inherited (as in I didn't write the original code) and it wasn't really clear what was causing the field integrity exception.

Turns out the code was setting a specific PricebookEntry UnitPrice where the UseStandardPrice was also set to true. When setting a specific UnitPrice the UseStandardPrice should be set to false.

From the help docs:

[Unit price:] "You can specify a value only if UseStandardPrice is set to false."

[UseStandardPrice:] Indicates whether this object uses the standard price defined in the standard Pricebook2 object (true) or not (false). If set to true, then the UnitPrice field is read-only, and the value will be the same as the UnitPricevalue in the corresponding PricebookEntry in the standard price book (that is, the PricebookEntry object whose Pricebook2Id refers to the standard price book and whose Product2Id and CurrencyIsoCode are the same as this object). For PricebookEntry objects associated with the standard Pricebook2 object, this field must be set to true.

Salesforce mapping Picklist values to Record Types

The picklist values that can be selected when editing a Salesforce Object are restricted based on the record type.

While fairly straight forward in concept I've found I often have to scratch my head for a minute before I remember where to configure this.

  • App Setup
  • Customize for Standard Objects or Create for Custom Objects
  • Select Object in question
  • Record Types
  • Click the Record Type Label for the Record Type
  • Click Edit under Picklists Available for Editing
  • Map the required Picklist Values

See Also:

Monday, March 19, 2012

Salesforce "Save and New" method for Controller Extension with custom sObject

A client recently wanted to add a "Save and New" command button to a Visualforce page that was using a controller extension overriding the new button. The users should be able to save the current sObject that was being created and then transition straight to adding another instance.

Creating a custom save method in Apex wasn't difficult as I could just keep a reference to the StandardController and then call save on that. However, creating a PageReference that would create the required StandardController was a bit more difficult.

My first attempt was more or less as follows. Note that this doesn't work in practice.

public with sharing class CustomExtensionController {
    
    Foo__c foo;
    ApexPages.StandardController sController;
    
    public CustomExtensionController (ApexPages.StandardController controller) {
        sController = controller;
        foo = (Opportunity)controller.getRecord();
    }
    
    public PageReference saveAndNew() {
        
        // Custom Save code here...
        
        PageReference pr = sController.save();

        return (new ApexPages.StandardController(new Foo__c())).edit();
    }
}

The results in the Exception:

Visualforce Error java.lang.UnsupportedOperationException: You cannot call edit() on a null object

It seems odd that there isn't a new() method on StandardController for such a scenario. Instead the PageReference can be built up manually using the schema.

public with sharing class CustomExtensionController {
    
    private Foo__c foo;
    private ApexPages.StandardController sController;
    private String queryString;
    
    public CustomExtensionController (ApexPages.StandardController controller) {
        sController = controller;
        foo = (Opportunity)controller.getRecord();

        // Keep track of any inbound query string parameters so they can be passed along when creating a new record
        List pageUrl = ApexPages.currentPage().getUrl().split('\\?');
        queryString = pageUrl[1];
    }
    
    public PageReference saveAndNew() {
        
        
        try {
            // Save the current sObject
            sController.save();

            // Get the Meta Data for Foo__c
            Schema.DescribeSObjectResult describeResult = sController.getRecord().getSObjectType().getDescribe();
            // Create PageReference for creating a new sObject and add any inbound query string parameters.
            PageReference pr = new PageReference('/' + describeResult.getKeyPrefix() + '/e?' + queryString);
            // Don't redirect with the viewstate of the current record.
            pr.setRedirect(true);
            return pr;
        } catch(Exception e) {
            // Don't redirect if something goes wrong. May be a validation or trigger issue on save.
            ApexPages.addMessages(e);
            return null;
        }
    }
}

See also:

Wednesday, March 14, 2012

Using the Standard Controller save method with an Extension Controller

When using an Extension Controller it can be useful to wrap the save method of the Standard Controller with a custom save method. This allows for things like:

  • custom validation
  • custom field assignment
  • altering the resuling PageReference redirection
public with sharing class CustomExtensionController {
    
    Opportunity opp;
    ApexPages.StandardController sController;
    
    public CustomExtensionController (ApexPages.StandardController controller) {
        sController = controller;
        opp = (Opportunity)controller.getRecord();
    }
    
    public PageReference saveCustom() {
        
        // Custom Save code here...
        
        PageReference pr = sController.save();
        return pr;
        
        // Alternatively, could return a PR to the view page.
        //pageReference pv = sController.view();

    }
}

Friday, March 9, 2012

Salesforce - Sending a notification when Batch Apex completes

When an apex batch job completes I've found it useful to send an email to the user who initiated the process. This can help expose issues where the batch job is failing and lets them know it is complete.

In your apex class that implements Database.Batchable<:sObject>:

global void finish(Database.BatchableContext BC){

 // Get the AsyncApexJob that represents the Batch job using the Id from the BatchableContext
 AsyncApexJob a = [Select Id, Status, NumberOfErrors, JobItemsProcessed,
  TotalJobItems, CreatedBy.Email, ExtendedStatus
  from AsyncApexJob where Id = :BC.getJobId()];
 
 // Email the Batch Job's submitter that the Job is finished.
 Messaging.SingleEmailMessage mail = new Messaging.SingleEmailMessage();
 String[] toAddresses = new String[] {a.CreatedBy.Email};
 mail.setToAddresses(toAddresses);
 mail.setSubject('BatchJobXYZ Status: ' + a.Status);
 mail.setPlainTextBody('The batch Apex job processed ' + a.TotalJobItems +
  ' batches with '+ a.NumberOfErrors + ' failures. ExtendedStatus: ' + a.ExtendedStatus);
  
 Messaging.sendEmail(new Messaging.SingleEmailMessage[] { mail });
}

Full credit really needs to go to Sam Arjmandi - Utilizing the Power of Batch Apex and Async Operations where I picked the base of this up from.

Thursday, March 8, 2012

Salesforce RecordType.sObjectType changes in managed packages

In hindsight this probably makes perfect sense but it did catch me out when working with an apex class used both within and outside a managed package.

I had a SOQL query against RecordType in the apex class that was used both in and out of a managed package. The query was filtering where the sObjectType equals a specific custom sObject (also in the managed package). The code worked fine outside the managed package but failed when deployed to a customers org.

The issue was the namespace prefix being prepended onto the custom sObjects name when used in the managed package.

E.g. Rather than filter on the custom sobject name directly:

List<RecordType> recordTypes = [Select r.SobjectType, r.Name, r.Id From RecordType r where sObjectType = 'SomeCustomObject__c'];

Use the schema meta data to get the correct value:

// In a managed package the SObjectType will be 'Prefix__SomeCustomObject__c' and in unmanaged it will just be 'SomeCustomObject__c'
Schema.DescribeSObjectResult someCustomObjectDescribe = SomeCustomObject__c.sObjectType.getDescribe();
string someCustomObjectSObjectType = someCustomObjectDescribe.getName();

List<RecordType> recordTypes = [Select r.SobjectType, r.Name, r.Id From RecordType r where sObjectType = :someCustomObjectSObjectType];

Salesforce FinalException: "ApexPages.addMessage can only be called from a Visualforce page" in anonymous Apex

When doing some testing using anonymous apex I encountered the following exception:

System.FinalException: ApexPages.addMessage can only be called from a Visualforce page

The solution was to check if there was a current page before attempting to add the message:

if(ApexPages.currentPage() != null){
    ApexPages.addMessage(new ApexPages.Message(ApexPages.Severity.ERROR, 
                                'Some very important message for the user'));
}

Wednesday, March 7, 2012

Simulating a System.Web.HttpContext during unit testing.

Long ago I came across an article about how to simulate a HttpContext during unit testing. To save myself future Googling I'll preserve the link here:

Unit Test Web Code Without A Web Server Using HttpSimulator

Saturday, March 3, 2012

WP7 Code snippets

A few useful Windows Phone 7 code snippets.


Check if there is a network connection available.

bool isAvailable = System.Net.NetworkInformation.NetworkInterface.GetIsNetworkAvailable();

Detect when the the shell chrome is covering the frame with the Obscured Event. E.g. incoming call

//Register for the Obscured event
PhoneApplicationFrame rootFrame = ((App)Application.Current).RootFrame;
rootFrame.Obscured += new EventHandler<ObscuredEventArgs>(rootFrame_Obscured);

//Handle the event
void rootFrame_Obscured(object sender, ObscuredEventArgs e)
{
    // ...
}

When doing any form of Trig you will need to be working in Radians rather than degrees.

Math.Sin(Microsoft.Xna.Framework.MathHelper.ToRadians((float)degrees));

URL-encode portions of a URI such as query strings and path components (alternative to HttpUtility.UrlEncode)


Check if the code is running in the designer. Useful to avoid code that would fail if the application isn't actually running.

if (DesignerProperties.GetIsInDesignMode(Application.Current.RootVisual))
{
    return;
}

Declare a Primary Key via System.Data.Linq.Mapping for a SQL CE database where the value will be kept in sync with the database after insert.

[Column(IsPrimaryKey = true, IsDbGenerated = true, DbType = "INT NOT NULL IDENTITY", CanBeNull = false, AutoSync = AutoSync.OnInsert)]
public int Id { get; set; }

Enumerate the values in a Enum. Note that Enum.GetValues() not available in the Windows Phone 7 API.

Type enumType = typeof(MyEnum);
foreach (var x in enumType.GetFields()) {
   if (x.IsLiteral) {
    MyEnum enumValue = (MyEnum)x.GetValue(enumType);
   }
}

Navigate to another page from a User Control. Stack Overflow - Silverlight - How to navigate from a User Control to a normal page?

(Application.Current.RootVisual as PhoneApplicationFrame).Navigate(uri);

Thursday, March 1, 2012

Salesforce Date Primitive Data Type doesn't adjust to the user timezone

After rolling lots of UTC Date data up through the partner API I was initially puzzled why a user on PDT (UTC-8) would be seeing the same value in the Salesforce interface as a user on NZDT (UTC+13).

In hindsight this makes sense, a Date without time doesn't really have a sensible adjustment for UTC to the users timezone.

From Primitive Data Types:

Date data. Fields of this type contain date values, such as ActivityDate in the Event object. Unlike dateTime fields, date fields contain no time value—the time portion of a date field is not relevant and is always set to midnight in the Coordinated Universal Time (UTC) time zone.